Hello Mule, One Request at a Time
Run a complete first Mule application, change its greeting and diagnose the first connection or deployment failure.
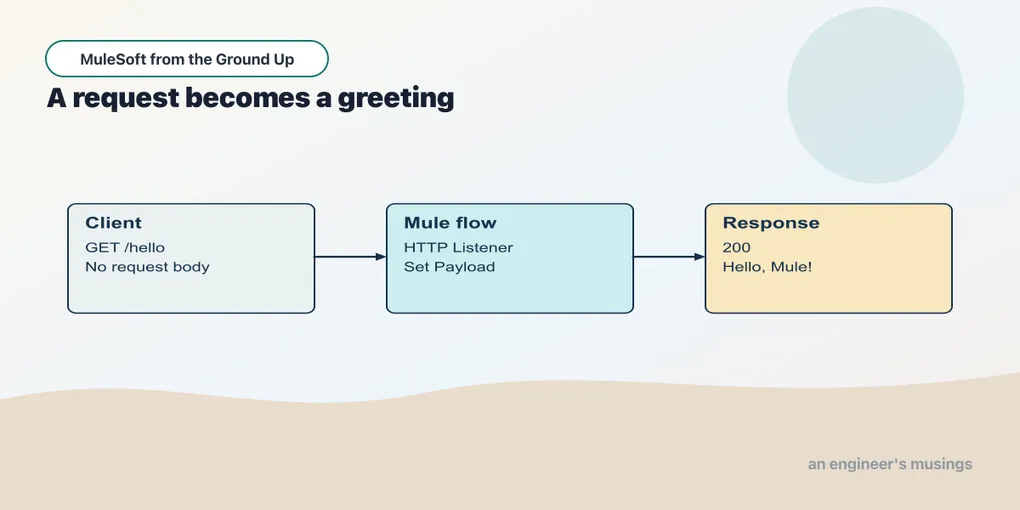
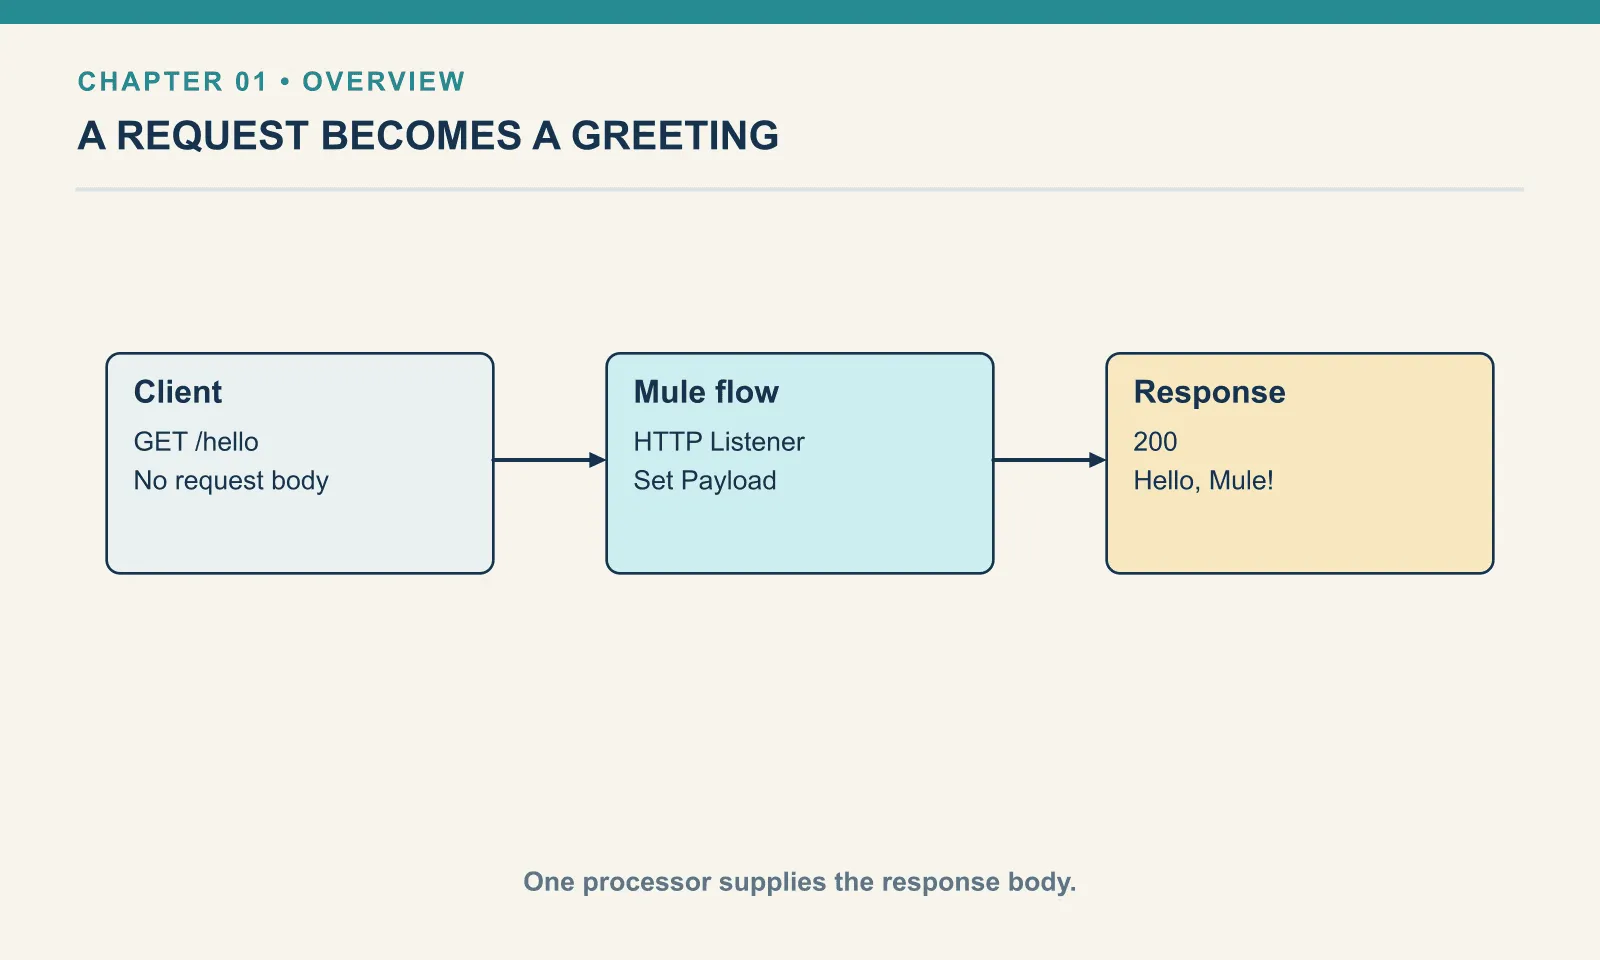
An HTTP Listener accepts a request, starts a Mule flow and returns the payload left when the flow finishes. We will make that exchange visible in Anypoint Code Builder (ACB): open a flow, inspect its two components, run it locally and change the greeting through a configuration panel.
Set up the book’s ACB environment
The book uses the desktop edition of ACB inside Visual Studio Code on macOS. Use a separate MuleSoft Book VS Code profile so the book’s extensions and settings stay together. On Windows and Linux, use Ctrl in place of Cmd for the editor shortcuts below.
The book was written against one fixed set of versions:
| Tool | Version used |
|---|---|
| Visual Studio Code | 1.110.1, Apple silicon |
| Anypoint Code Builder extension pack | 1.22.1 |
| Mule runtime | 4.12.3 |
| Java | 17.0.13+11 |
| HTTP connector | 1.11.3 |
Install the official Salesforce Anypoint Code Builder extension pack from VS Code’s Extensions view. Its gear menu offers Install Another Version. Select the book’s version and disable automatic extension updates in the book profile. The pack’s version alone does not lock its component extensions; the downloadable examples include environment.json with every installed component version and a setup note explaining the pin. Compare those versions before expecting identical screens. VS Code itself has a separate update mechanism; recheck Help → About after any restart. The screenshots use ACB’s Descriptive canvas layout; the command MuleSoft: Toggle Canvas Layout (Classic/Descriptive) switches layouts.
Download the ACB examples and extract them. They include the project metadata needed by this editor baseline. Open File → Open Folder and select book/checkpoints/01-hello, the folder containing pom.xml. Open only one checkpoint at a time: the local checkpoints use port 18881 and the same application artifact name.
ACB needs a Java 17 JDK, Maven and its local Mule runtime. Let its dependency setup complete before running. The first build downloads dependencies, so it needs network access. The local exercises here were run without signing into Anypoint Platform; publishing or deploying to the platform is outside this chapter.
In Explorer, expand src → main → mule, then open app.xml. This filename is Mule’s stored configuration. ACB presents it as a flow canvas; you will edit the canvas and its component panels rather than type XML. Maven still records connector dependencies in pom.xml, and the application descriptor records the runtime requirement. Visual editing does not remove those project files.
Receive a request and supply a value
Example 001 — Hello Mule
The hello-mule flow contains an HTTP Listener followed by Set Payload. If another flow is selected, use the Flow List icon in the canvas toolbar and choose hello-mule.
- Click Listener on the canvas. In General, inspect Path:
/hello. - Inspect its selected connection,
HTTP_Listener. Open Edit Connection to see Host127.0.0.1and Port18881. Keep those values. Close the connection editor to return to the flow. - Click Set Payload. Its Value is the literal text
Hello, Mule!. Keep the field in text mode for this example.
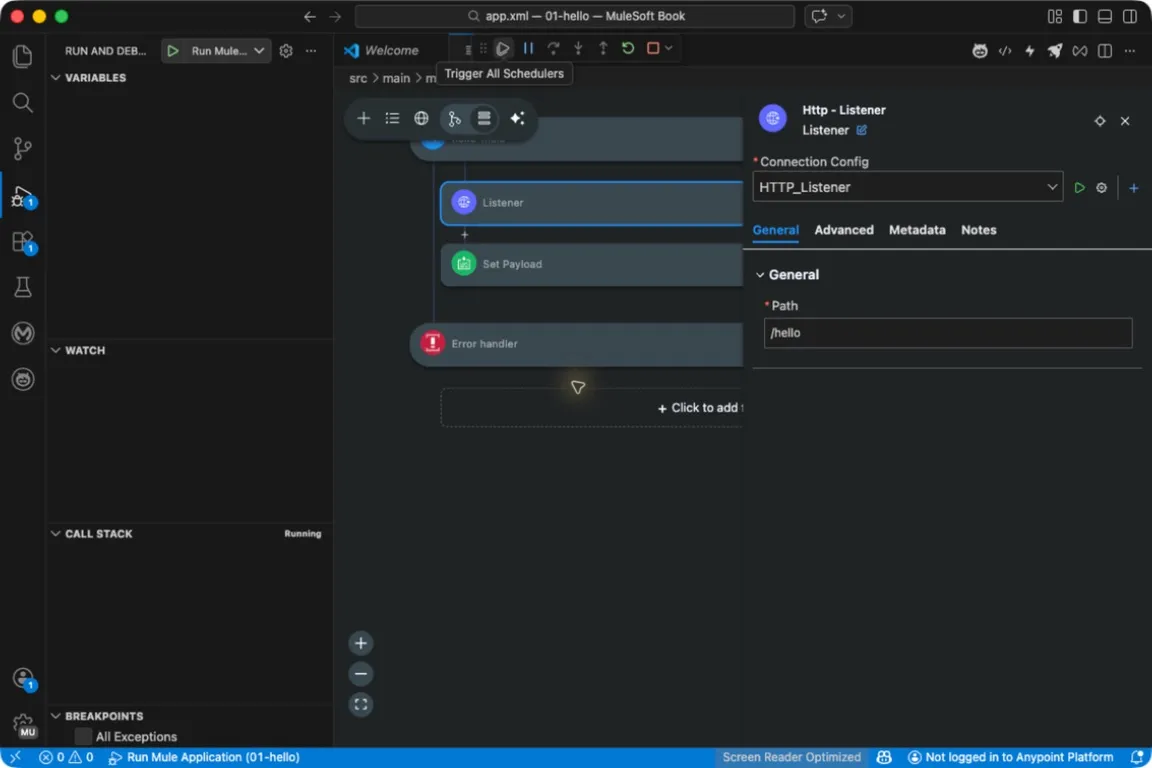
The Listener’s path identifies this endpoint. Its connection supplies the address and port.
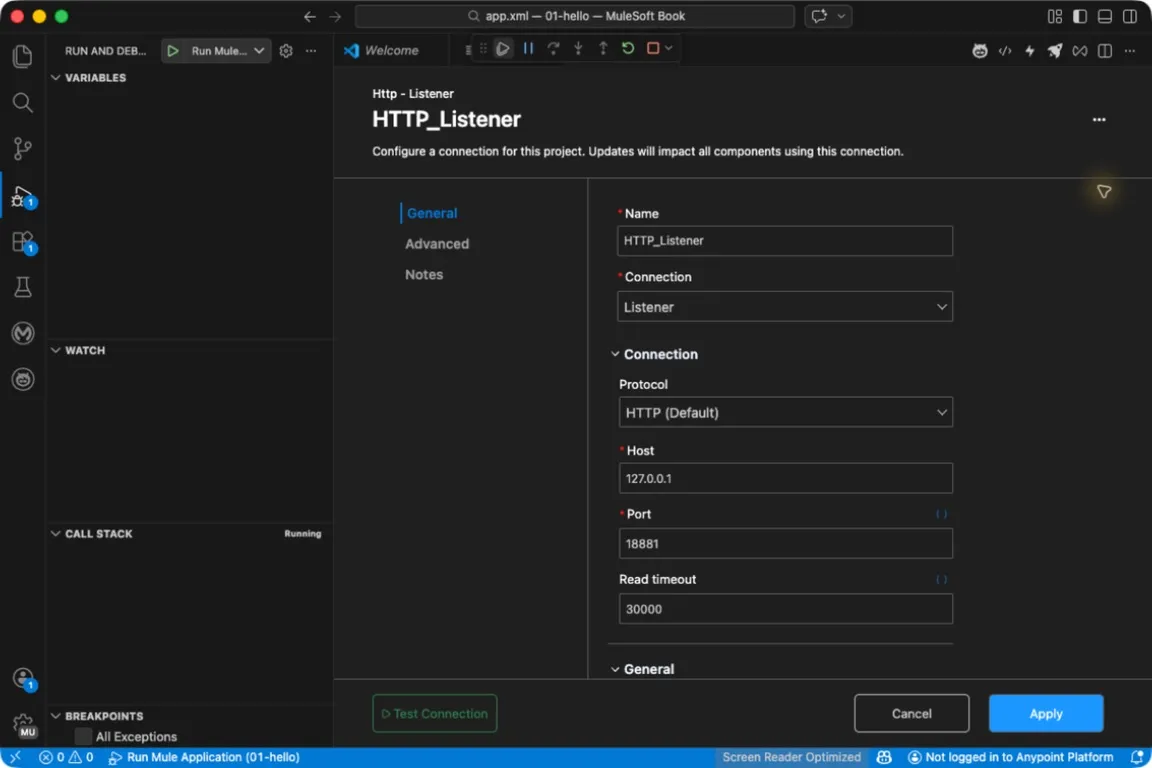
Loopback keeps the teaching listener on this computer. A different service using port 18881 must be stopped or moved before this one can bind it.
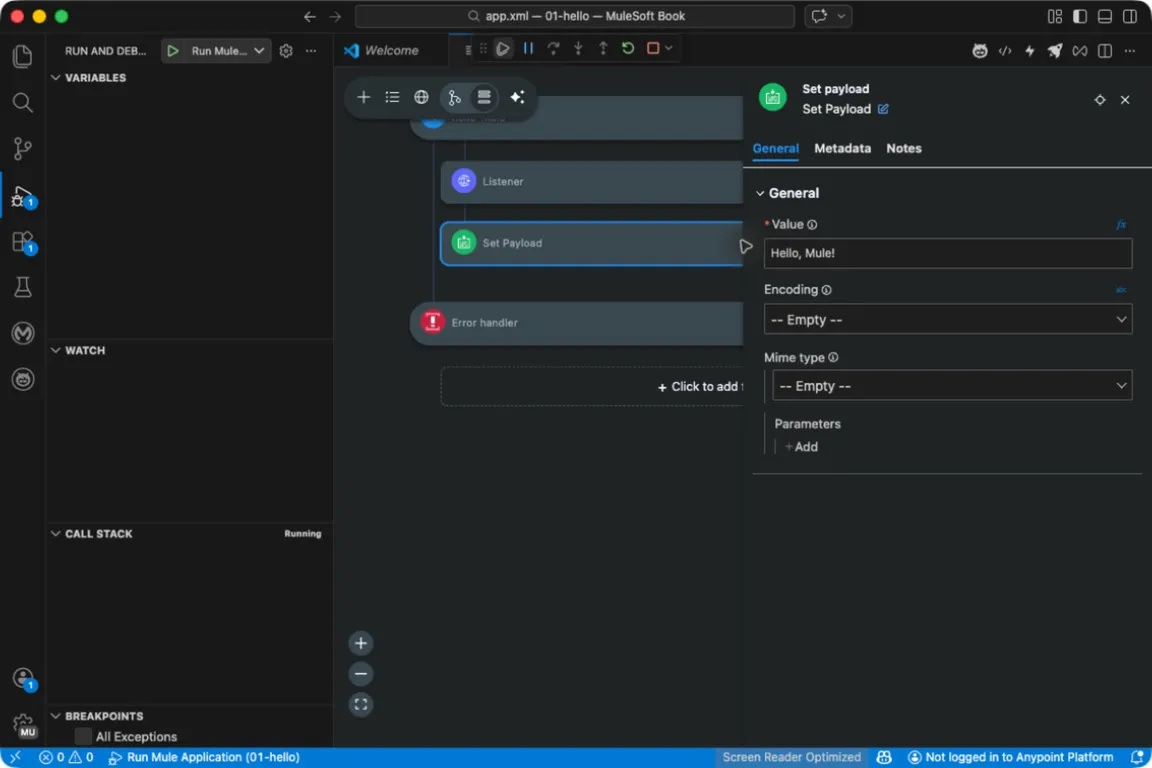
Set Payload supplies the response body. Enter plain text without quotes in text mode.
The Listener is a source: a matching GET request creates the event that starts this flow. Set Payload is a processor: it replaces the event’s message body. When the flow finishes, the Listener returns that body to the client. There is no separate return component in this example.
Run from ACB and send a request
Open Run and Debug (Cmd+Shift+D). Select Run Mule Application in the launch dropdown and press the green start button. If ACB has not created launch configurations yet, open the Command Palette (Cmd+Shift+P) and run MuleSoft: Run Mule Application. In a workspace containing several projects, check the project name in the launch dropdown before starting.
Watch the Terminal panel for the application’s successful deployment. A running Java process is not enough: Mule starts before the application finishes deploying. Keep the runtime terminal open. Use Terminal → New Terminal for an independent HTTP client:
curl --include http://127.0.0.1:18881/helloExpect status 200 and this body:
Hello, Mule!The request has now crossed the whole path: client, Listener, Set Payload and response. You can repeat the check from the extracted examples’ root with python3 book/run.py verify 01. That checks the running HTTP endpoint; it does not start the application.
Make one change through the panel
Example 002 — Change the greeting
- Select Set Payload and replace Value with
Hello, Dana!. - Leave the field, then click Save and Hot-deploy to Local Runtime in the editor toolbar.
- Wait for redeployment to finish in the runtime terminal. Send the same curl request again.
The response should now be Hello, Dana!. The URL stays the same because you changed the processor’s value, not the Listener’s connection or path. Editing a field alone does not prove that the running application has received your change.
Restore Hello, Mule!, hot-deploy again and repeat the request. The checkpoint verifier deliberately expects this original greeting. Finally, use Stop in the debug toolbar before opening chapter 2’s project.
Locate a failure before changing the flow
| Observation | First place to look |
|---|---|
| Connection refused | Check that the application deployed and is listening on port 18881. |
| Address already in use | Stop the previous checkpoint’s runtime before starting this one. |
| Deployment fails | Read the first deployment error in ACB’s Terminal. |
| HTTP 404 | Compare the requested path with the Listener’s /hello. |
| Old greeting after an edit | Save and hot-deploy; wait for successful redeployment. |
| No canvas or component configuration | Confirm you opened the checkpoint folder containing the POM and let ACB finish loading dependencies. |
Changing a payload cannot repair a refused connection: no flow received that request. Maven resolves and packages dependencies, Java runs the tools, and Mule executes the application. Use the failing stage to decide where to investigate.
Try it
1. Change the body again. Make the response name your teaching application. Which control changes?
Show answer
Change Set Payload → Value in text mode, then save and hot-deploy. Leave the Listener alone.
2. Change the path. In the Listener panel, replace /hello with /greeting. Predict the old and new URL results before hot-deploying and calling them.
Show answer
The new path returns the greeting. The old path no longer matches this Listener. Restore /hello and the original greeting before running the verifier.
3. Explain the two terminals. Why keep the runtime terminal separate from the curl terminal?
Show answer
The runtime terminal hosts the server and its logs. The other terminal acts as a client. Stopping the runtime removes the server curl is calling.
You now have a request that enters a flow and a value that leaves it. Next we will inspect the event between those points.
Run against: Desktop ACB pack 1.22.1 with the component versions recorded in the downloadable examples’ environment.json, VS Code 1.110.1 on macOS arm64, Mule 4.12.3 and Java 17.0.13+11. Canvas operations and local HTTP behavior checked on 20 September 2026; platform deployment and other operating systems were not tested.
Next: What Is in This Request?
Comments